Last Updated on 28th July 2023 by Tia Ellahi
A great way to elevate your home’s Kerb appeal is through updating your front door. As soon as you’ve gone ahead and made the decision to purchase a brand new front door, the first thing you’ll need to do is choose the material you’d like the door to be made from. There are a range of options to pick from including uPVC, timber, aluminium and composite.
Whilst measuring a front door may seem like a pretty straightforward task, it’s essential that you do it accurately. Make sure to take your time and measure up from the different angles to ensure the measurements for your new door are as precise as they can be.
This guide provides instructions for measuring a door and is intended for use by experienced tradespeople or skilled DIYers conducting surveys. We cannot be held responsible for any inaccuracies in the surveys performed.
The Do’s & Don’ts
To help you get the most out of your brand new door, follow these do’s and don’ts below.
Do’s
- Use a metric tape measure
- Write down every measurement you take
- Allow for sufficient clearance for the height, width and bottom of the door so it opens fully
- Check which side you would like the handle to be on (do this as you look at the door from the outside)
- Ensure the door is smaller than the opening
Don’ts
- Don’t use a tape measure if you can’t read the measurements clearly
- Don’t use dressmakers tape or anything similar to this
How To Measure For A New Composite Door
You’re measuring the overall height and width of the door (this includes the door, frame and cill).
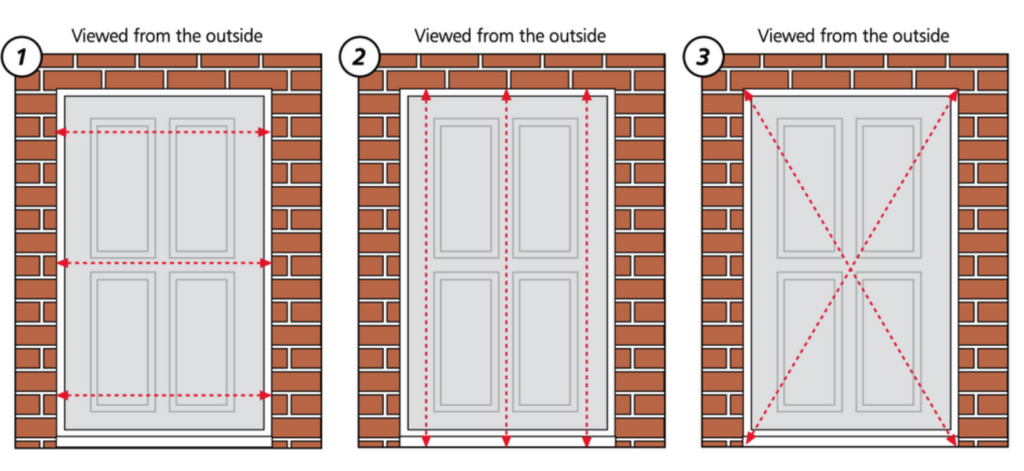
1 – Measuring The Width
When it comes to measuring the width, you’ll need to measure in 3 points; the top, the middle and the bottom. Take the smallest measurement and deduct 10mm.
2 – Measuring The Height
Again, you’ll need to measure in 3 points; the left, the centre and the right. Take the smallest measurement before deducting 10mm.
Remember to measure to the underside of the existing cill unless it is NOT being replaced (i.e. a concrete cill).
3 – Diagonals
Make sure the opening is square by carefully measuring the diagonals (which is shown in red). Between each measurement, there shouldn’t be any more than a 5mm difference.
The Most Common Type of Plan View
The diagram below clearly shows how the existing door butts up to the internal plaster line.
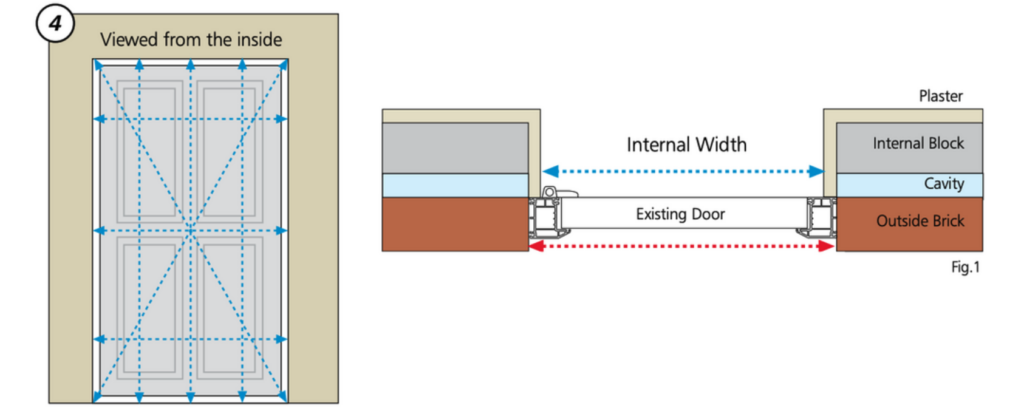
You’ll need to carefully repeat the process from the inside of the door, from plasterwork to plasterwork. Don’t forget to make a note of the smallest measurement like before.
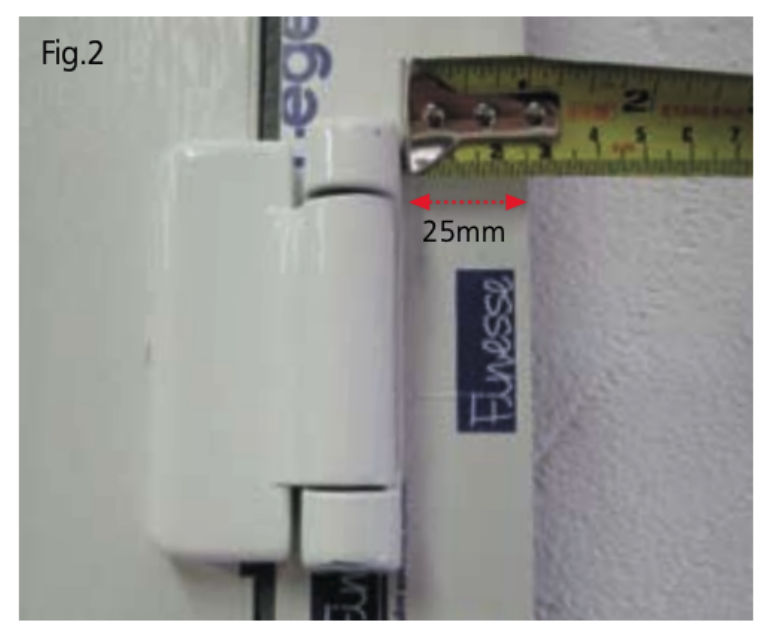
Addon Example
Opening internal is 800mm and external, 870mm (the external operning smallest measurement is 870mm).
if the internal plaster reveal is large, it will be necessary to use the right frame addon.
Addons available in Various Sizes

If you have an opening width of 870mm externally, this means the manufacturing size will be 860mm. However, looking at the example above, the plaster reveal is about 35mm on each side, meaning the door hinge will foul the plaster line by 5mm.
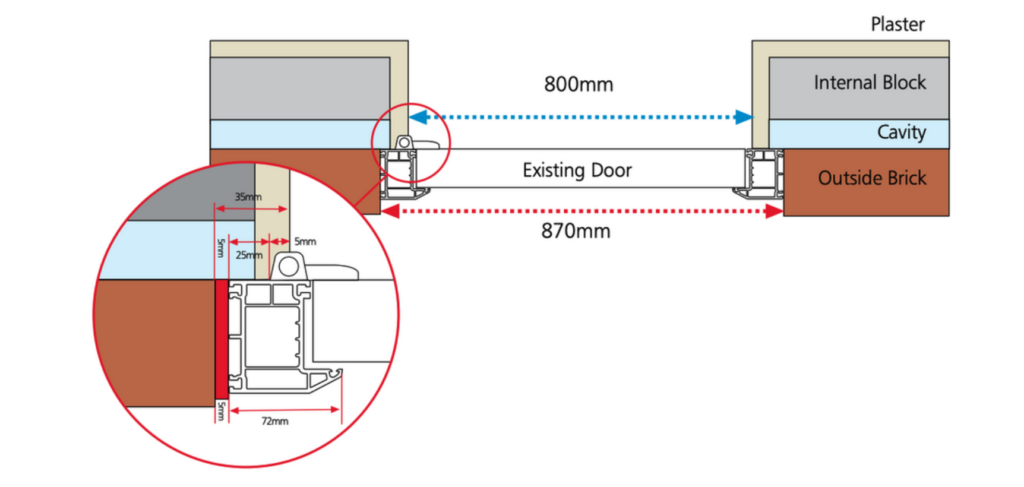
The overall manufacturing size of 860mm includes a 15mm add-on and 845mm door. This means the hinge will clear the plaster line, allowing the door to open correctly.
Make sure that the door outer frame still manages to clear the plaster line on the lock side and if it doesn’t, you may need to add an add-on on this side.
Box Sash Plane View
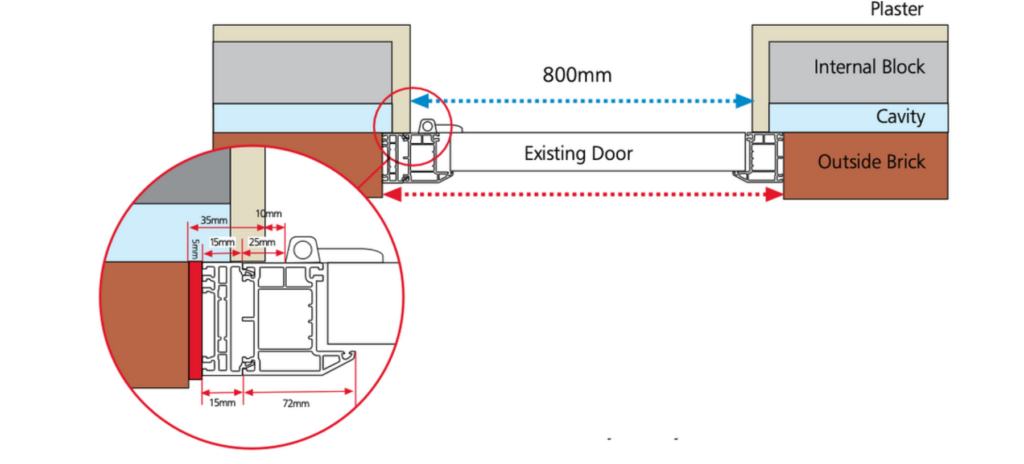
However, it may be possible that you find yourself with a box sash scenario when the reverse of the plan is shown as below.
You’ll have to measure brick to brick externally and then add on 5-10mm each side (to the smallest size). This is so that the outer frame sits nicely and neatly behind the existing brickwork.

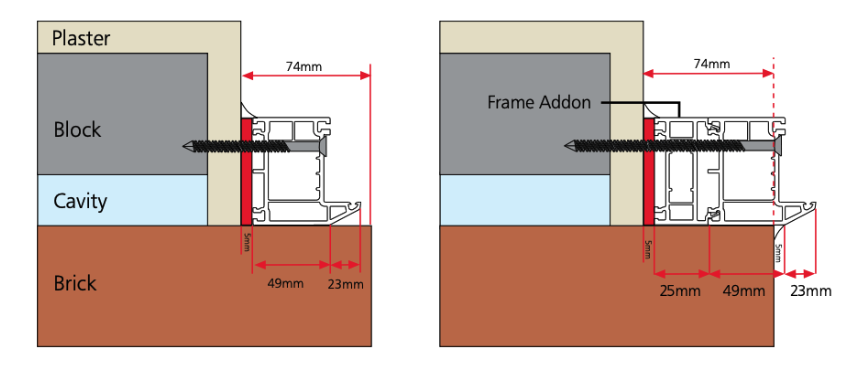
Using Addon To Clear Plasterline
With a box sash installation, you’ll find that the Kerb of the frame can be fixed with a frame Add-on to make up the gap present. The Addons are usually available in the following sizes; 15mm, 25mm & 50mm. (You will most likely have to remove existing architrave to survey accurately)
Cills Options
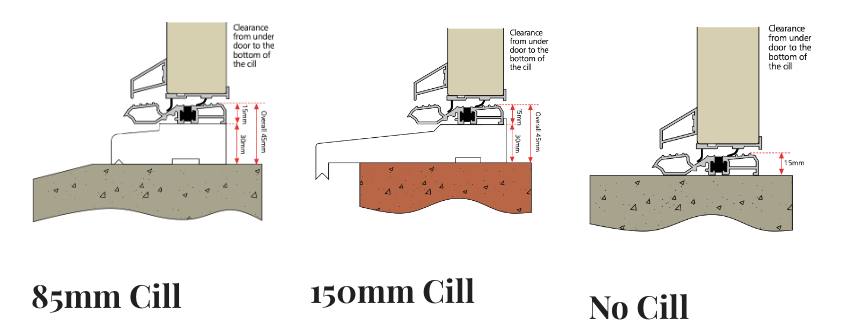
This is an open in door with an aluminium low threshold fitted on an 85mm PVC sub cill to stone/ concrete.
This is an open in door with an aluminium low threshold fitted on 150mm PVC sub cill to brickwork.
There is no cill present here, so the open in door with an aluminium threshold is fitted on to stone/ concrete.
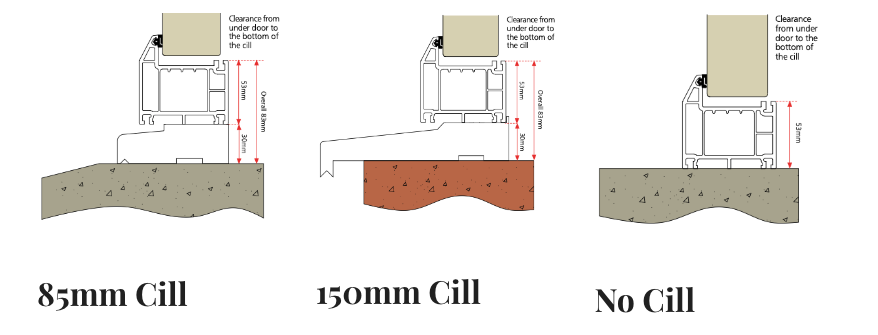
Here is an open in door but with PVC threshold, fitted on to an 85mm PVC sub cill to stone/ concrete.
Here is an open in door with a PVC threshold fitted on to a 150mm PVC sub cill to brickwork.
There is no cill present here, so the open in door with a PVC threshold is fitted on to stone/ concrete.
Conclusion
So, there you have it! Some simple steps to help you measure your front door precisely.
If you lack confidence or want to make sure you do it as accurately as possible, it may be best to consider bringing in a professional door fitter who will be able to get the perfect measurements for your new front door.
If you’re looking to buy a new front door and have some questions, just give our team a call on 01642 309571 or click here to contact us via live chat.
FAQs about Measuring a Front Door
Q: What’s the best metric unit to use for measuring a door?
A: As doors are a pretty bespoke item, nearly all manufacturers will prefer to take measurements in millimetres as this is the most accurate type of metric.
Q: What’s the standard size of a front door?
A: It’s always important to remember that the size of a front door varies as it’s all depends on the door type, however in residential and commercial buildings, the standard door height is 2030mm, with the standard door width being about 915mm.
Q: Do I need to include the frame when measuring the door?
A: It’s advised to always measure from the brick opening rather than including the existing door/ door frame.
If you’re going to choose a custom front door, the existing frame won’t be very helpful. However, if you much prefer the standard door measurements you can go ahead and include the door frame.